
Red Velvet Cookies Recipe – Perfectly Soft, Chewy & Absolutely Delicious
Hey there! Ready to whip up some delicious red velvet cookies? These babies are soft, chewy, and loaded with chocolate goodness. Let’s get baking!
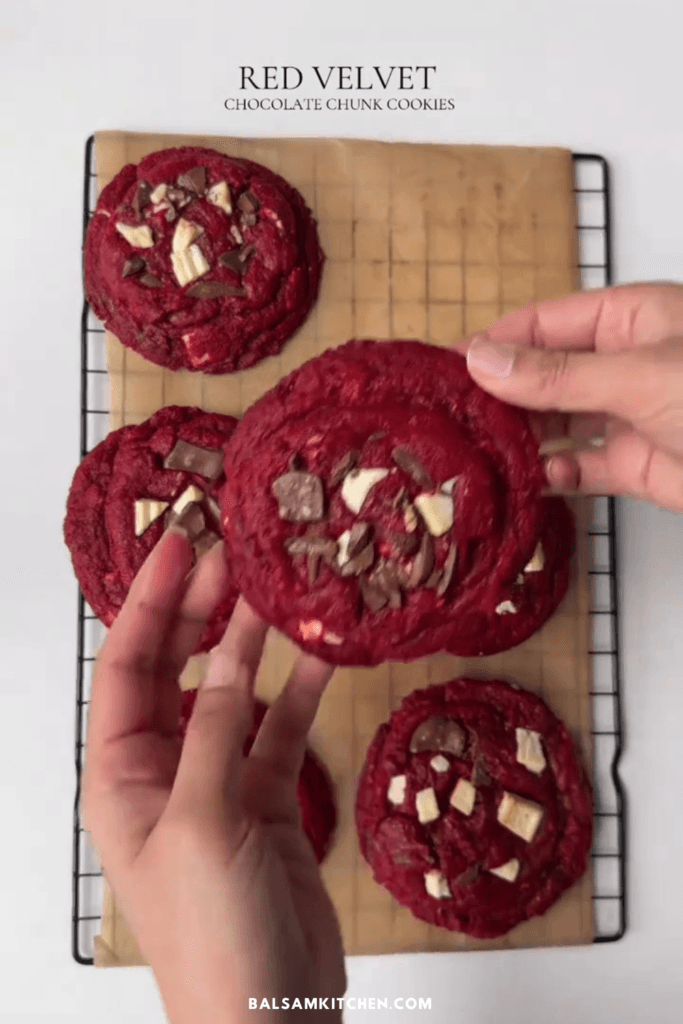
If you love the rich flavor of red velvet cake and the comforting chew of bakery-style cookies, this red velvet cookies recipe is exactly what you’re looking for. These cookies are dense, tender in the middle, a bit crunchy around the edges, and loaded with semi-sweet and white chocolate pieces for an ideal flavor combination.
What makes red velvet cookies special isn’t just the color – it’s the subtle cocoa taste, the hint of vanilla, and that signature soft texture that keeps you reaching for one more.
Table of Contents
Why You’ll Love This Red Velvet Cookies Recipe
- Soft and chewy texture (even the next day)
- Deep red color without bitterness
- Perfect balance of cocoa, vanilla, and chocolate
- Freezer-friendly dough for better flavor and thickness
- Great for holidays, Valentine’s Day, or everyday baking
Red Velvet Cookies Recipe Ingredients
Dry Ingredients
- 2 ¼ cups (285 g) all-purpose flour
- 2 tablespoons cornstarch
- 2 tablespoons natural cocoa powder
- ¼ teaspoon baking soda
- ½ teaspoon baking powder
- Pinch of salt
Wet Ingredients
- 1 cup (225 g) cold unsalted butter, cubed
- 1 cup (220 g) dark brown sugar
- 3 tablespoons (37 g) granulated sugar
- 1 large egg + 1 egg yolk (cold)
- 1 tablespoon vanilla bean paste
- 1 teaspoon white vinegar
- 1 tablespoon red gel food coloring
Chocolate
- 1 cup semi-sweet chocolate chips, chopped
- ½ cup white chocolate chips, chopped
Instructions
1. Cream the Butter and Sugars
In a large bowl or stand mixer, beat the cold cubed butter on high speed for about 2 minutes until creamy.
Add the brown sugar and granulated sugar, then beat for 2–3 minutes until light and fluffy.
Tip: Starting with cold butter helps create thicker, bakery-style cookies.
2. Add the Flavor & Color
Add the egg, egg yolk, vanilla bean paste, white vinegar, and red food coloring.
Beat on high for 3–4 minutes until the mixture is smooth and deeply red.
The vinegar doesn’t make the cookies sour — it simply enhances the red velvet flavor and reacts with the cocoa.
3. Mix the Dry Ingredients
In a separate bowl, whisk together:
- Flour
- Cocoa powder
- Cornstarch
- Baking powder
- Baking soda
- Salt
Slowly incorporate the dry blend into the wet components and stir only until mixed.
4. Fold in the Chocolate
Gently fold in the chopped semi-sweet and white chocolate chips.
The mix of chocolates gives these cookies their signature contrast and richness.
5. Shape & Chill
Scoop 4-ounce tall cookie dough balls and place them on a baking sheet.
Freeze for at least 2 hours or overnight.
Chilling is key for thick cookies that don’t spread too much.
6. Bake
Preheat your oven to 350°F (175°C).
Arrange 3 to 4 cookies on each tray, ensuring they are 4 inches apart. Bake for 16–18 minutes, until the edges are set but the centers are still soft.
7. Cool & Enjoy
Allow the cookies to rest on the baking sheet for 15 minutes, then move them to a wire rack.
They will firm up on the outside while staying chewy inside.
Pro Tips for Perfect Red Velvet Cookies Recipe
- Use gel food coloring, not liquid, for a vibrant red color.
- Don’t overbake — soft centers are what make this recipe shine.
- For extra bakery style, press a few chocolate chunks on top right after baking.
- Keep in a sealed container for a maximum of 4 days.
For even more cookie inspiration, check out our Chewy Dubai Chocolate Cookie Recipe — a must-try for chocolate fans!
Final Thoughts
This red velvet cookie recipe delivers everything you crave: a striking hue, rich taste, and a tender, chewy consistency that feels indulgent yet simple to savor. Whether you’re preparing for visitors or indulging yourself, these cookies are sure to leave a lasting impression.


Leave a Reply